| 41 | 写真や画像を、オートシェイプの形に表示するには? http://cgi.fuji.ne.jp/~fj2094/cgi-bin1/wwwlng.cgi?print+200202/02020125.txt 「挿入したデジカメの画像をオートシェィプを使って(オートシェィプの形に)切り抜くには?」【編集】 |
| Excel97、Excel2000 共通 1. 【挿入】【図】【オートシェイプ】で、図形を選択してシートに挿入します。 2. 挿入したオートシェイプを右クリック【オートシェイプの書式設定】 【色と線】の【塗りつぶし】で【塗りつぶし効果】【図】【図の選択】で、写真等を選択します。 |
|
| 42 | 図形の名前を変更するには? |
| 図形を選択し、名前ボックスで変更できます。 | |
| Sub
test() Dim a As String, aa As String a = Selection.Name aa = Application.InputBox(Prompt:="選択した図形の名前は 「" & a & "」 です。 " _ & Chr(10) & "新しい名前を入力してください", Type:=2) Selection.Name = aa MsgBox "図形の名前を 「" & aa & "」 に変更しました。" End Sub このコードの使い方は、マクロの使い方(1)標準モジュールにあります。 |
|
| 43 | 指定セル範囲内にある図形を削除するには? http://www.ae.wakwak.com/~efc21/cgi-bin/wwwlng.cgi?print+200203/02030259.txt 「指定セル範囲内にある画像を削除するには」 【VBAラウンジ】 |
| Sub
test2() '指定した範囲と、"部分的に重なる"場合も削除するなら Dim myShp As Shape Dim myR As Range, SR As Range On Error Resume Next Set myR = Application.InputBox("図形を削除する範囲のセルをドラッグしてください", Type:=8) If Err.Number <> 0 Then Exit Sub On Error GoTo 0 For Each myShp In ActiveSheet.Shapes Set SR = Range(myShp.TopLeftCell, myShp.BottomRightCell) If Not Intersect(SR, myR) Is Nothing Then myShp.Delete End If Set SR = Nothing Next Set myR = Nothing End Sub Sub test3() '完全に指定範囲内に含まれる図形のみ削除するなら Dim myShp As Shape Dim myR As Range, SR As Range On Error Resume Next Set myR = Application.InputBox("図形を削除する範囲のセルをドラッグしてください", Type:=8) If Err.Number <> 0 Then Exit Sub On Error GoTo 0 For Each myShp In ActiveSheet.Shapes Set SR = Range(myShp.TopLeftCell, myShp.BottomRightCell) If Not Intersect(SR, myR) Is Nothing Then If Intersect(SR, myR).Cells.Count = SR.Cells.Count Then myShp.Delete End If End If Set SR = Nothing Next Set myR = Nothing End Sub このコードの使い方は、マクロの使い方(1)標準モジュールにあります。 |
|
| 44 | 同じ値のセル同士、直線で結ぶには? http://cgi.fuji.ne.jp/~fj2094/cgi-bin3/wwwlng.cgi?print+200206/02060010.txt 「同じ数字どうし、線で結びあわせるには?」 【グラフラウンジ】 |
下のように、1行おきという条件でシート内の全てのセルを一気に処理します。  Sub miko_test() |
|
| 45 | 丸囲み文字を書くには? http://cgi.fuji.ne.jp/~fj2094/cgi-bin1/wwwlng.cgi?print+200207/02070214.txt 「まるすうじ⑳以上を入力するには?」 【編集ラウンジ】 http://www.keep-on.com/~excelyou/2000lng1/200009/00090085.txt 「21以上に○をつけるには?」 http://cgi.fuji.ne.jp/~fj2094/cgi-bin1/wwwlng.cgi?print+200206/02060167.txt 「○で囲まれた文字で表示するには」 【編集ラウンジ】 |
| 方法1 外字を作成する。 方法2 Wordの特殊文字を辞書登録する。 方法3 オートシェイプ○に、「テキストの追加」 で文字を入れる。 丸が大きすぎるようなら、○とテキストは別々に作成し、塗りつぶしなし・テキストは線もなしにする。 |
|
| 上記方法3をマクロで自動で作成します。選択したセルの縦幅の○で、文字を囲みます。 文字色の指定は、フォント色のインデックス番号を入力します。 インデックス番号は、こちらの【色見本】のマクロで確認してください。 Sub 丸囲み文字3() 次の【丸囲み文字_○色変更】マクロは、上記で作成した丸囲み文字の文字色を変更するコードです。 Sub 丸囲み文字_○色変更()
'先に文字色を変更してから実行してください
|
|
| 46 | 図形をアニメーションのように動かすには? http://www.ae.wakwak.com/~efc21/cgi-bin/wwwlng.cgi?print+200207/02070258.txt 「画像を連続でスクロールのように綺麗に移動するには。」 【VBAラウンジ】 |
| 動かしたい図形を選択してから実行します Sub 左上から右下へ() Dim nWait As Integer, i As Integer nWait = 20 With ActiveSheet.Shapes(Selection.Name) For i = 1 To 200 .Left = .Left + 1 .Top = .Top + 1 DoEvents Sleep nWait Next End With End Sub Sub 左から右へ() Dim i For i = 1 To 1000 ActiveSheet.Shapes(Selection.Name).Left = i DoEvents Next i End Sub このコードの使い方は、マクロの使い方(1)標準モジュールにあります。 |
|
| 47 | 選択したセル範囲内の矢印だけを削除するには? |
| '指定範囲のAddLineで描いた矢印だけを削除します Sub miko_test() '選択範囲内に完全に含まれる矢印のみ削除 Dim myShp As Shape Dim myR As Range, SR As Range On Error Resume Next Set myR = Selection If Err.Number <> 0 Then Exit Sub On Error GoTo 0 For Each myShp In ActiveSheet.Shapes Set SR = Range(myShp.TopLeftCell, myShp.BottomRightCell) If Not Intersect(SR, myR) Is Nothing Then If Intersect(SR, myR).Cells.Count = SR.Cells.Count Then myShp.Select If Selection.ShapeRange.Line.EndArrowheadStyle <> msoArrowheadNone Then Selection.Delete End If End If Set SR = Nothing Next Set myR = Nothing End Sub Sub miko_test2() '選択範囲内と"部分的に重なる"場合も削除 Dim myShp As Shape Dim myR As Range, SR As Range On Error Resume Next Set myR = Selection If Err.Number <> 0 Then Exit Sub On Error GoTo 0 For Each myShp In ActiveSheet.Shapes Set SR = Range(myShp.TopLeftCell, myShp.BottomRightCell) If Not Intersect(SR, myR) Is Nothing Then myShp.Select If Selection.ShapeRange.Line.EndArrowheadStyle <> msoArrowheadNone Then Selection.Delete End If Set SR = Nothing Next Set myR = Nothing End Sub このコードの使い方は、マクロの使い方(1)標準モジュールにあります。 |
|
| 48 | 螺旋を引きたい http://cgi.fuji.ne.jp/~fj2094/cgi-bin1/wwwlng.cgi?print+200311/03110065.txt 「螺旋を引きたい」 【編集ラウンジ】 |
| Sub 鳴門巻き5()
'横の螺旋 Const X = 100 Const Y = 100 Const R = 50 Const Pi = 3.1415 Const IncNum = 4 Dim Ratio As Single Dim i As Long With ActiveSheet.Shapes.BuildFreeform(msoEditingAuto, X, Y + R) Ratio = 0 For i = 30 To 9000 Step 30 .AddNodes msoSegmentCurve, msoEditingAuto, X + Sin(i * Pi / 180) * R + Ratio, _ Y + Cos(i * Pi / 180) * R Ratio = Ratio + IncNum Next .ConvertToShape.ScaleWidth 0.3, msoFalse End With End Sub このコードの使い方は、マクロの使い方(1)標準モジュールにあります。  |
|
| Sub 鳴門巻き3()
'縦の螺旋 Dim i As Long Dim H1 As Long, H2 As Long Dim W As Integer Dim X As Integer, Y As Integer X = 100: Y = 100 With ActiveSheet.Shapes.BuildFreeform(msoEditingAuto, X, Y) H1 = 5: H2 = 1: W = 10 For i = 90 To 7200 Step 90 If i Mod 360 = 90 Then .AddNodes msoSegmentCurve, msoEditingAuto, X + W, Y + H1 Y = Y + H1 ElseIf i Mod 360 = 180 Then .AddNodes msoSegmentCurve, msoEditingAuto, X, Y + H1 Y = Y + H1 ElseIf i Mod 360 = 270 Then .AddNodes msoSegmentCurve, msoEditingAuto, X - W, Y - H2 Y = Y - H2 Else .AddNodes msoSegmentCurve, msoEditingAuto, X, Y - H2 Y = Y - H2 End If Next .ConvertToShape.Select End With End Sub このコードの使い方は、マクロの使い方(1)標準モジュールにあります。  |
|
| Excel2002用(残念ながら2000だと綺麗な螺旋になりません。バグっぽい?(-_-;)) Sub 鳴門巻き4() '横の螺旋 Const X = 100 Const Y = 100 Const R = 50 Const Pi = 3.1415 Const IncNum = 0.3 Dim Ratio As Single Dim i As Long With ActiveSheet.Shapes.BuildFreeform(msoEditingAuto, X, Y + R) Ratio = 0 For i = 30 To 18000 Step 15 .AddNodes msoSegmentCurve, msoEditingAuto, X + Sin(i * Pi / 180) * R + Ratio, _ Y + Cos(i * Pi / 180) * R Ratio = Ratio + IncNum Next .ConvertToShape.ScaleWidth 0.5, msoFalse End With End Sub このコードの使い方は、マクロの使い方(1)標準モジュールにあります。 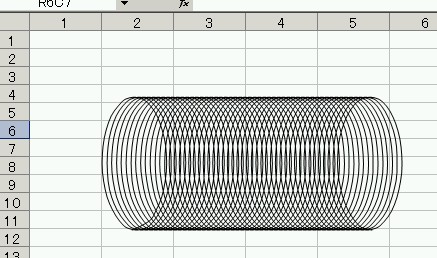 |
|
| Sub 鳴門巻きスペシャル() Const X = 150 Const Y = 150 Const R = 15 Const Pi = 3.1415 Const IncNum = 0.1 Dim Spiral As Shape Dim Base As Shape Dim Ratio As Single Dim i As Long With ActiveSheet.Shapes With .BuildFreeform(msoEditingAuto, X, Y + R) Ratio = 1 For i = 30 To 720 Step 15 .AddNodes msoSegmentCurve, msoEditingAuto, X + Sin(i * Pi / 180) * R * Ratio, _ Y + Cos(i * Pi / 180) * R * Ratio Ratio = Ratio + IncNum Next Set Spiral = .ConvertToShape With Spiral .Line.Weight = 5# .Line.ForeColor.RGB = RGB(255, 0, 255) .ScaleHeight 0.5, msoFalse End With End With Set Base = .AddShape(msoShape16pointStar, Spiral.Left - 40, _ Spiral.Top - 40, _ Spiral.Width + 80, _ Spiral.Height + 80) With Base .ThreeD.SetThreeDFormat msoThreeD3 .Adjustments.Item(1) = 0.05 .ThreeD.Depth = 12# .ThreeD.PresetLightingDirection = msoLightingNone .ZOrder msoSendToBack End With .Range(Array(Spiral.Name, Base.Name)).Group End With Set Spiral = Nothing Set Base = Nothing End Sub このコードの使い方は、マクロの使い方(1)標準モジュールにあります。  |
|
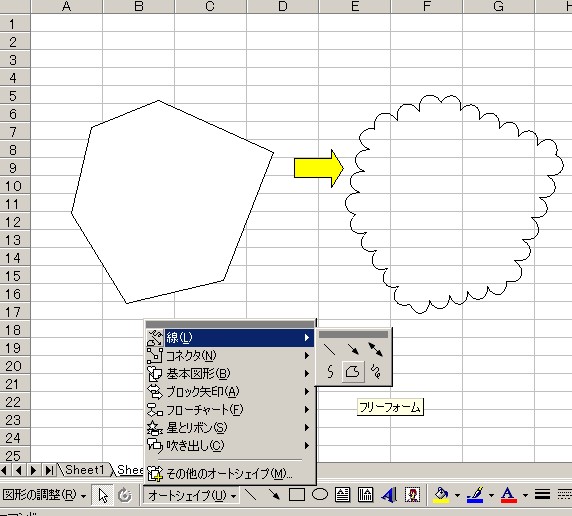
| 49 | CAD図面などの変更箇所を示す雲マークを作図するには? http://park7.wakwak.com/~efc21/cgi-bin/wwwlng.cgi?print+200312/03120019.txt 「雲マークを作図したい」 【VBAラウンジ】 |
|
’直線で描いたフリーフォームを選択して実行すると、直線を半円型の線にします。 Sub FreeForm2CloudyShape() Const RAD = 3.14159265358979 / 180 Const R_BASE = 15# Dim Target As Shape, Side As Shape Dim arrNode As Variant Dim NodeX As New Collection, NodeY As New Collection Dim Sides As New Collection, SideLen As Single Dim CircleCount As Long, CircleWidth As Single Dim CompL As Single, CompR As Single Dim CompT As Single, CompB As Single Dim MaxL As Long, MaxR As Long Dim MaxT As Long, MaxB As Long Dim Flg As Boolean, i As Long, j As Long Dim dx As Single, dy As Single Dim r As Single, x As Single, y As Single If TypeName(Selection) = "Drawing" Then With Selection.ShapeRange If .Type = msoFreeform Then If .Nodes.Count > 2 Then Set Target = ActiveSheet.Shapes(Selection.Name) End If End With End If If Target Is Nothing Then MsgBox "変換可能なフリーフォームが選択されていません。", vbCritical GoTo ExitHandler End If If MsgBox("選択された図形の縁にそって雲形のシェイプを描きます。", _ vbOKCancel + vbInformation) = vbCancel Then GoTo ExitHandler CompL = 999999999 CompR = 0 CompT = 999999999 CompB = 0 With Target For i = 1 To .Nodes.Count arrNode = .Nodes(i).Points NodeX.Add arrNode(1, 1) NodeY.Add arrNode(1, 2) If arrNode(1, 1) < CompL Then MaxL = i CompL = arrNode(1, 1) End If If arrNode(1, 1) > CompR Then MaxR = i CompR = arrNode(1, 1) End If If arrNode(1, 2) < CompT Then MaxT = i CompT = arrNode(1, 2) End If If arrNode(1, 2) > CompB Then MaxB = i CompB = arrNode(1, 2) End If Next arrNode = .Nodes(1).Points NodeX.Add arrNode(1, 1) NodeY.Add arrNode(1, 2) End With For i = 2 To NodeX.Count dx = (NodeX(i) - NodeX(i - 1)) dy = (NodeY(i) - NodeY(i - 1)) SideLen = Sqr(dx ^ 2 + dy ^ 2) If SideLen < R_BASE Then MsgBox "頂点間の距離が小さすぎます。", vbCritical GoTo ExitHandler End If If dy / 2 + NodeY(i - 1) < SideLen / 2 Then MsgBox "現在の図形の位置では正しく変換できません。" & vbCrLf & _ "位置を下方向に移動させてから再実行してください。", vbCritical GoTo ExitHandler End If Next If CInt(MaxL > MaxB) + CInt(MaxB > MaxR) + CInt(MaxR > MaxT) + CInt(MaxT > MaxL) < -1 Then j = NodeX.Count For i = 1 To j NodeX.Add NodeX(j - i + 1) NodeY.Add NodeY(j - i + 1) Next For i = 1 To j NodeX.Remove 1 NodeY.Remove 1 Next End If With ActiveSheet.Shapes For i = 2 To NodeX.Count dx = (NodeX(i) - NodeX(i - 1)) dy = (NodeY(i) - NodeY(i - 1)) SideLen = Sqr(dx ^ 2 + dy ^ 2) CircleCount = SideLen \ R_BASE r = SideLen / CircleCount / 2 x = dx / 2 + NodeX(i - 1) y = dy / 2 + NodeY(i - 1) + SideLen / 2 With .BuildFreeform(msoEditingAuto, x, y + r) For j = 1 To CircleCount .AddNodes msoSegmentCurve, msoEditingCorner, x + Sin(45 * RAD) * r, _ y + Cos(45 * RAD) * r, x + Sin(135 * RAD) * r, _ y + Cos(135 * RAD) * r, x + Sin(180 * RAD) * r, y + Cos(180 * RAD) * r x = x + Sin(180 * RAD) * r y = y + Cos(180 * RAD) * r * 2 Next Set Side = .ConvertToShape Sides.Add Side With Side .ScaleWidth 2, msoFalse, msoScaleFromTopLeft .Top = .Top - r CircleWidth = .Width If NodeX(i) > NodeX(i - 1) Then .Left = .Left - CircleWidth / 2 .IncrementRotation Atn(dy / dx) / RAD + 90 .Left = .Left - Sin(Atn(dy / dx)) * CircleWidth / 2 .Top = .Top + Cos(Atn(dy / dx)) * CircleWidth / 2 ElseIf NodeX(i) < NodeX(i - 1) Then .Left = .Left - CircleWidth / 2 .IncrementRotation Atn(dy / dx) / RAD - 90 .Left = .Left + Sin(Atn(dy / dx)) * CircleWidth / 2 .Top = .Top - Cos(Atn(dy / dx)) * CircleWidth / 2 Else If NodeY(i) > NodeY(i - 1) Then .IncrementRotation 180 .Left = .Left - CircleWidth End If End If End With End With Next End With DoEvents If MsgBox("変換結果を確定しますか?", vbYesNo + vbQuestion) = vbYes Then If MsgBox("元の図形を削除しますか?", vbYesNo + vbQuestion) = vbYes Then Target.Delete If MsgBox("図形グループ化しますか?", vbYesNo + vbQuestion) = vbYes Then Flg = True For Each Side In Sides Side.Select Flg Flg = False Next Selection.Group End If Else For Each Side In Sides Side.Delete Next End If ExitHandler: Set Target = Nothing Set NodeX = Nothing Set NodeY = Nothing Set Sides = Nothing Set Side = Nothing End Sub このコードの使い方は、マクロの使い方(1)標準モジュールにあります。
|
|
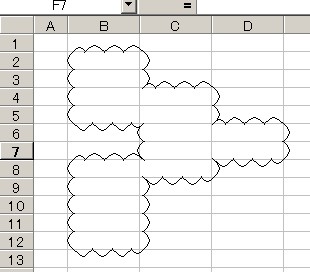
| ’選択範囲のセルの外周に、雲マークの線を描くコードです。 Private Const iPiPlaceCount = 8 Private Const iPiPlaceTopCenter = 0 Private Const iPiPlaceTopLeft = 1 Private Const iPiPlaceMiddleLeft = 2 Private Const iPiPlaceBottomLeft = 3 Private Const iPiPlaceBottomCenter = 4 Private Const iPiPlaceBottomRight = 5 Private Const iPiPlaceMiddleRight = 6 Private Const iPiPlaceTopRight = 7 Private Type UShapeCreateCloud FB As FreeformBuilder BeginX As Single BeginY As Single CellBorders As Collection End Type Private mp As UShapeCreateCloud Public Function CreaterCloudShape(ByVal Range As Range) As Shape Dim celStart As Range Dim cel As Range, celOld As Range Dim iPlace As Long, iOldPlace As Long Dim oFB As FreeformBuilder Set mp.CellBorders = New Collection '' 一つのセルだけなら、四辺を描いて終了します。 If Range.Count = 1 Then drawEdge Range, xlEdgeTop drawEdge Range, xlEdgeLeft drawEdge Range, xlEdgeBottom drawEdge Range, xlEdgeRight Else '' 左上カドから始めます。 '' ここで、このセルの上には線を引いておきます。 iPlace = iPiPlaceTopRight Set celStart = topLeftCell(Range) drawEdge celStart, xlEdgeTop '' 反時計回りで、縁のセルを見つけ、そのさらに縁に(罫線の部分に)線を引いていきます。 Set cel = celStart Do iOldPlace = iPlace Set celOld = cel Set cel = forwardEdgeCell(Range, cel, iPlace) searchEdge iPlace, iOldPlace, cel, celOld Loop Until (cel.Address = celStart.Address) End If '' 線を閉じて、シェイプに変換して、返します。 '' 塗りは空にしておきます。 encloseEdge Set CreaterCloudShape = mp.FB.ConvertToShape Set mp.FB = Nothing CreaterCloudShape.Fill.Visible = msoFalse End Function Private Sub encloseEdge() With mp .FB.AddNodes msoSegmentCurve, msoEditingAuto, .BeginX, .BeginY End With End Sub Private Sub drawEdge(ByVal cel As Range, ByVal EdgeIndex As Long) Dim sKey As String Dim vRet As Variant Dim x As Single, y As Single, rDir As Single Dim rBegin As Single, rEnd As Single Dim rDiff As Single Const rSize = 15, rCombinSize = 5 Const rPeakRatio = 0.65 With mp '' すでに描画していないか調べます。 '' コレクションに登録済みなら描画済みです。 sKey = cel.Address & ":" & CStr(EdgeIndex) On Error Resume Next vRet = .CellBorders(sKey) If Err.Number = 0 Then Exit Sub On Error GoTo 0 '' コレクションに登録します。 '' 必要なのはキーで、値はダミーです。 .CellBorders.Add "Dummy", sKey '' 描画位置を求め、描画します。 '' 上下と左右で処理をまとめています。上と下、左と右は、進む方向が違うだけ。 '' 15 ポイントずつ区切って半円を描きますが、 '' 小さな端数が出ないように 残りが 15 + 5 以下なら1つの半円にします。 With cel Select Case EdgeIndex Case xlEdgeTop, xlEdgeBottom If EdgeIndex = xlEdgeTop Then y = .Top rBegin = .Left + .Width rEnd = .Left rDir = -1 Else y = .Top + .Height rBegin = .Left rEnd = .Left + .Width rDir = 1 End If Do rDiff = Abs(rEnd - rBegin) If rDiff <= rSize + rCombinSize Then drawHalfCircle rBegin, y, rEnd, y, rBegin + (rDiff / 2) * rDir, y + _ ((rDiff / 2) * rPeakRatio) * rDir Exit Do Else drawHalfCircle rBegin, y, rBegin + rSize * rDir, y, rBegin + _ (rSize / 2) * rDir, y + ((rSize / 2) * rPeakRatio) * rDir rBegin = rBegin + rSize * rDir End If Loop Case xlEdgeLeft, xlEdgeRight If EdgeIndex = xlEdgeLeft Then x = .Left rBegin = .Top rEnd = .Top + .Height rDir = 1 Else x = .Left + .Width rBegin = .Top + .Height rEnd = .Top rDir = -1 End If Do rDiff = Abs(rEnd - rBegin) If rDiff <= rSize + rCombinSize Then drawHalfCircle x, rBegin, x, rEnd, x - ((rDiff / 2) * rPeakRatio) * rDir, _ rBegin + (rDiff / 2) * rDir Exit Do Else drawHalfCircle x, rBegin, x, rBegin + rSize * rDir, x - _ ((rSize / 2) * rPeakRatio) * rDir, rBegin + (rSize / 2) * rDir rBegin = rBegin + rSize * rDir End If Loop End Select End With End With End Sub Private Sub drawHalfCircle(ByVal xBegin As Single, ByVal yBegin As Single, _ ByVal xEnd As Single, ByVal yEnd As Single, _ ByVal xPeak As Single, ByVal yPeak As Single) '' 半円を描きますが、始点を引く必要はありません。 '' 前回の終了点が始点となります。 With mp If .FB Is Nothing Then Set .FB = ActiveSheet.Shapes.BuildFreeform(msoEditingAuto, xPeak, yPeak) .BeginX = xPeak .BeginY = yPeak Else .FB.AddNodes msoSegmentCurve, msoEditingAuto, xPeak, yPeak End If .FB.AddNodes msoSegmentCurve, msoEditingAuto, xEnd, yEnd .FB.AddNodes msoSegmentCurve, msoEditingAuto, xEnd, yEnd End With End Sub Private Sub searchEdge(ByVal PlaceIndex As Long, ByVal PrevPlaceIndex As Long, _ ByVal CurrCell As Range, ByVal PrevCell As Range) '' 来た方向を勘案し、1つ前のセルと今のセルの罫線位置に、線を引きます。 Select Case PlaceIndex Case iPiPlaceTopCenter If PrevPlaceIndex = iPiPlaceBottomCenter Then drawEdge PrevCell, xlEdgeTop End If drawEdge PrevCell, xlEdgeLeft drawEdge CurrCell, xlEdgeLeft Case iPiPlaceTopLeft If PrevPlaceIndex = iPiPlaceTopRight Then drawEdge PrevCell, xlEdgeLeft End If drawEdge PrevCell, xlEdgeBottom drawEdge CurrCell, xlEdgeLeft Case iPiPlaceMiddleLeft If PrevPlaceIndex = iPiPlaceTopRight _ Or PrevPlaceIndex = iPiPlaceMiddleRight _ Or PrevPlaceIndex = iPiPlaceBottomRight Then drawEdge PrevCell, xlEdgeLeft End If drawEdge PrevCell, xlEdgeBottom drawEdge CurrCell, xlEdgeBottom Case iPiPlaceBottomLeft If PrevPlaceIndex = iPiPlaceTopLeft Then drawEdge PrevCell, xlEdgeBottom End If drawEdge PrevCell, xlEdgeRight drawEdge CurrCell, xlEdgeBottom Case iPiPlaceBottomCenter If PrevPlaceIndex = iPiPlaceTopCenter Then drawEdge PrevCell, xlEdgeBottom End If drawEdge PrevCell, xlEdgeRight drawEdge CurrCell, xlEdgeRight Case iPiPlaceBottomRight If PrevPlaceIndex = iPiPlaceBottomLeft Then drawEdge PrevCell, xlEdgeRight End If drawEdge PrevCell, xlEdgeTop drawEdge CurrCell, xlEdgeRight Case iPiPlaceMiddleRight If PrevPlaceIndex = iPiPlaceTopLeft _ Or PrevPlaceIndex = iPiPlaceMiddleLeft _ Or PrevPlaceIndex = iPiPlaceBottomLeft Then drawEdge PrevCell, xlEdgeRight End If drawEdge PrevCell, xlEdgeTop drawEdge CurrCell, xlEdgeTop Case iPiPlaceTopRight If PrevPlaceIndex = iPiPlaceTopLeft Then drawEdge PrevCell, xlEdgeTop End If drawEdge PrevCell, xlEdgeLeft drawEdge CurrCell, xlEdgeTop End Select End Sub Private Function forwardEdgeCell(ByVal Range As Range, ByVal AncherCell As Range, _ ByRef PlaceIndex As Long) As Range Dim i As Long '' アンカーセルを中心に、来た方向の隣から反時計回りに、セルがないか探します。 For i = PlaceIndex + 1 To PlaceIndex + 8 Select Case (i Mod iPiPlaceCount) Case iPiPlaceTopCenter If Not (Application.Intersect(Range, Cell_RealOffset(AncherCell, -1, 0)) Is Nothing) Then Set forwardEdgeCell = Cell_RealOffset(AncherCell, -1, 0) End If Case iPiPlaceTopLeft If Not (Application.Intersect(Range, Cell_RealOffset(AncherCell, -1, -1)) Is Nothing) Then Set forwardEdgeCell = Cell_RealOffset(AncherCell, -1, -1) End If Case iPiPlaceMiddleLeft If Not (Application.Intersect(Range, Cell_RealOffset(AncherCell, 0, -1)) Is Nothing) Then Set forwardEdgeCell = Cell_RealOffset(AncherCell, 0, -1) End If Case iPiPlaceBottomLeft If Not (Application.Intersect(Range, Cell_RealOffset(AncherCell, 1, -1)) Is Nothing) Then Set forwardEdgeCell = Cell_RealOffset(AncherCell, 1, -1) End If Case iPiPlaceBottomCenter If Not (Application.Intersect(Range, Cell_RealOffset(AncherCell, 1, 0)) Is Nothing) Then Set forwardEdgeCell = Cell_RealOffset(AncherCell, 1, 0) End If Case iPiPlaceBottomRight If Not (Application.Intersect(Range, Cell_RealOffset(AncherCell, 1, 1)) Is Nothing) Then Set forwardEdgeCell = Cell_RealOffset(AncherCell, 1, 1) End If Case iPiPlaceMiddleRight If Not (Application.Intersect(Range, Cell_RealOffset(AncherCell, 0, 1)) Is Nothing) Then Set forwardEdgeCell = Cell_RealOffset(AncherCell, 0, 1) End If Case iPiPlaceTopRight If Not (Application.Intersect(Range, Cell_RealOffset(AncherCell, -1, 1)) Is Nothing) Then Set forwardEdgeCell = Cell_RealOffset(AncherCell, -1, 1) End If End Select If Not (forwardEdgeCell Is Nothing) Then PlaceIndex = (i + iPiPlaceCount / 2) Mod iPiPlaceCount Exit Function End If Next End Function Private Function topLeftCell(ByVal Range As Range) As Range Dim rngArea As Range Dim cel As Range For Each rngArea In Range.Areas Set cel = rngArea.Cells(1, 1) If topLeftCell Is Nothing Then Set topLeftCell = cel Else If cel.Row < topLeftCell.Row Then Set topLeftCell = cel ElseIf cel.Row = topLeftCell.Row Then If cel.Column < topLeftCell.Column Then Set topLeftCell = cel End If End If End If Next End Function Private Function Cell_RealOffset(ByVal AncherCell As Range, _ ByVal RowOffset As Long, ByVal ColOffset As Long) As Range With AncherCell Set Cell_RealOffset = .Worksheet.Cells(.Row + RowOffset, .Column + ColOffset) End With End Function Sub 雲() CreaterCloudShape Selection End Sub このコードの使い方は、マクロの使い方(1)標準モジュールにあります。
|
|
| 50 | 指定の行にある図形だけを削除するには? http://park7.wakwak.com/~efc21/cgi-bin/wwwlng.cgi?print+200406/04060275.txt 「行単位でオートシェイプを削除するには?」 【VBAラウンジ】 |
|
’指定の行に完全に含まれた図形だけを、全て削除します。 Sub mikotest() Dim myShp As Shape, C As Range, gyou As Variant gyou = Application.InputBox("何行目のシェイプを削除しますか?", Type:=1) If (VarType(gyou) = vbBoolean) Then Exit Sub For Each C In Rows(gyou) For Each myShp In ActiveSheet.Shapes If (C.Top + C.Height >= myShp.Top + myShp.Height) And (C.Top <= myShp.Top) Then myShp.Delete Next Next End Sub このコードの使い方は、マクロの使い方(1)標準モジュールにあります。 |
|
|
’指定の行に一部でもかかっている図形を全て削除します。 Sub mikotest2() Dim myShp As Shape, C As Range, gyou As Variant gyou = Application.InputBox("何行目のシェイプを削除しますか?", Type:=1) If (VarType(gyou) = vbBoolean) Then Exit Sub For Each C In Rows(gyou) For Each myShp In ActiveSheet.Shapes If (C.Top + C.Height > myShp.Top) And (C.Top < myShp.Top + myShp.Height) Then myShp.Delete Next Next End Sub このコードの使い方は、マクロの使い方(1)標準モジュールにあります。 |
|
| 51 | |
| 52 | |
| 53 | |
| 54 | |
| 55 | |
| 56 | |
| 57 | |
| 58 | |
| 59 | |
| 60 | |