| 1 | 既存の罫線の色を範囲指定して一気に変更するには http://www.keep-on.com/~excelyou/2000lng1/200008/00080034.txt 「既存の罫線の色変更をするには?」 「編集ラウンジ」 |
||
| Sub 罫線色変更() Dim ra As Range Dim x As String Dim m As Integer, n As Long Dim msg As String, ttl As String, res As Long, DM As String DM = Chr(13) & Chr(10) ' 範囲指定 msg = "指定の範囲のみについて、罫線の色を変えますか?" & DM & DM msg = msg & "<いいえ> を選ぶと、シート全体が対象になります。" ttl = "範囲は?" res = MsgBox(msg, 35, ttl) If res = vbNo Then m = ActiveSheet.UsedRange.Columns.Count n = ActiveSheet.UsedRange.Rows.Count Range(Cells(1, 1), Cells(n, m)).Select ElseIf res = vbCancel Then Exit Sub End If ' ' *********** ' 罫線の色変更 ' *********** ' Application.ScreenUpdating = False On Error GoTo ErrHandler x = InputBox("罫線の色は?" & Chr(10) & "1)黒" & Chr(10) & "2)白" & Chr(10) & "3)赤" _ & Chr(10) & "4)黄緑" & Chr(10) & "5)青" & Chr(10) & "6)黄色" _ & Chr(10) & "7)マゼンダ" & Chr(10) & "8)シアン" & Chr(10) & "9)茶色" _ & Chr(10) & "10)緑" & Chr(10) & "11)紺" & Chr(10) & "12)黄土色" _ & Chr(10) & "13)紫" & Chr(10) & "14)深緑" & Chr(10) & "15)灰色" & Chr(10) & "16)濃い灰色", "?", "0") For Each ra In Selection With ra '上辺 If .Borders(xlEdgeTop).LineStyle <> xlNone Then _ .Borders(xlEdgeTop).ColorIndex = x '下辺 If .Borders(xlEdgeBottom).LineStyle <> xlNone Then _ .Borders(xlEdgeBottom).ColorIndex = x '左辺 If .Borders(xlEdgeLeft).LineStyle <> xlNone Then _ .Borders(xlEdgeLeft).ColorIndex = x '右辺 If .Borders(xlEdgeRight).LineStyle <> xlNone Then _ .Borders(xlEdgeRight).ColorIndex = x End With Next MsgBox ("終わりました。") Application.ScreenUpdating = True Exit Sub ErrHandler: MsgBox ("ご指定の [" & x & "] には、該当する色がありません。") End Sub このコードの使い方は、マクロの使い方(1)標準モジュールにあります。 |
|||
| 2 | アクティブセルの枠の色を変更するには http://www.keep-on.com/excelyou/2000lng5/200009/00090129.txt 「セルの色を変更したい」 【その他ラウンジ】 |
||
| 全てシートのモジュールに書き込みます。 Private Sub Worksheet_SelectionChange(ByVal Target As Range) Call Waku End Sub Sub Waku() 'アクティブセルの枠に色をつける Static PrevCell As Range Static PreStyle As Variant Static PreTopColor, PreBottomColor, PreLeftColor, PreRightColor As Variant Static PreTopStyle, PreBottomStyle, PreLeftStyle, PreRightStyle As Variant Static PreTopWeight As Long Static PreBottomWeight As Long Static PreLeftWeight As Long Static PreRightWeight As Long Application.ScreenUpdating = False If IsEmpty(PreStyle) Then GoTo Dainyu End If '前のセルに罫線のデータが無かったら If PreTopStyle = xlLineStyleNone And PreBottomStyle = xlLineStyleNone And _ PreLeftStyle = xlLineStyleNone And PreRightStyle = xlLineStyleNone Then PrevCell.Borders.LineStyle = xlLineStyleNone Else 'LineStyleが設定されていたら With PrevCell .Borders.LineStyle = xlLineStyleNone If PreTopStyle <> xlLineStyleNone Then .Borders(xlEdgeTop).LineStyle = PreTopStyle .Borders(xlEdgeTop).ColorIndex = PreTopColor .Borders(xlEdgeTop).Weight = PreTopWeight End If If PreBottomStyle <> xlLineStyleNone Then .Borders(xlEdgeBottom).LineStyle = PreBottomStyle .Borders(xlEdgeBottom).ColorIndex = PreBottomColor .Borders(xlEdgeBottom).Weight = PreBottomWeight End If If PreLeftStyle <> xlLineStyleNone Then .Borders(xlEdgeLeft).LineStyle = PreLeftStyle .Borders(xlEdgeLeft).ColorIndex = PreLeftColor .Borders(xlEdgeLeft).Weight = PreLeftWeight End If If PreRightStyle <> xlLineStyleNone Then .Borders(xlEdgeRight).LineStyle = PreRightStyle .Borders(xlEdgeRight).ColorIndex = PreRightColor .Borders(xlEdgeRight).Weight = PreRightWeight End If End With End If Dainyu: With ActiveCell PreStyle = .Borders.LineStyle PreTopStyle = .Borders(xlEdgeTop).LineStyle PreBottomStyle = .Borders(xlEdgeBottom).LineStyle PreLeftStyle = .Borders(xlEdgeLeft).LineStyle PreRightStyle = .Borders(xlEdgeRight).LineStyle PreTopColor = .Borders(xlEdgeTop).ColorIndex PreBottomColor = .Borders(xlEdgeBottom).ColorIndex PreLeftColor = .Borders(xlEdgeLeft).ColorIndex PreRightColor = .Borders(xlEdgeRight).ColorIndex PreTopWeight = .Borders(xlEdgeTop).Weight PreBottomWeight = .Borders(xlEdgeBottom).Weight PreLeftWeight = .Borders(xlEdgeLeft).Weight PreRightWeight = .Borders(xlEdgeRight).Weight End With ' Debug.Print PreTopStyle; PreBottomStyle; PreLeftStyle; PreRightStyle ActiveCell.BorderAround Weight:=xlMedium, ColorIndex:=3 Set PrevCell = ActiveCell Application.ScreenUpdating = True End Sub このコードの使い方は、マクロの使い方(2)該当するシートのモジュールにあります。 |
|||
| 標準モジュールに Public Patc As Range Sub Setpatc(ByVal Target As Range) Set Patc = Target End Sub このコードの使い方は、マクロの使い方(1)標準モジュールにあります。 Workbookのモジュールに Private Sub Workbook_BeforeSave(ByVal SaveAsUI As Boolean, Cancel As Boolean) Patc.Borders.LineStyle = xlNone End Sub このコードの使い方は、マクロの使い方(3)This Workbookのモジュールにあります。 シートのモジュールに Private OrgColor As Integer Private Sub Worksheet_Deactivate() Patc.Borders.LineStyle = xlNone End Sub Private Sub Worksheet_SelectionChange(ByVal Target As Range) Static Patc2 As Range If Not Patc Is Nothing Then Set Patc2 = Patc Patc2.Borders.LineStyle = xlNone End If Target.BorderAround Weight:=xlMedium, ColorIndex:=3 Setpatc Target End Sub このコードの使い方は、マクロの使い方(2)該当するシートのモジュールにあります。 |
|||
| 3 | アクティブセルに色を付け認識性をアップするには http://www.keep-on.com/~excelyou/2000lng4/200009/00090454.txt 「アクティブセルに色を付け認識性をアップしたい」 【VBAラウンジ】 |
||
| Private OrgColor As Integer Private PrevCell As Range Private Sub Worksheet_SelectionChange(ByVal Target As Range) If Not PrevCell Is Nothing Then PrevCell.Interior.ColorIndex = OrgColor End If OrgColor = ActiveCell.Interior.ColorIndex ActiveCell.Interior.ColorIndex = 3 Set PrevCell = ActiveCell End Sub このコードの使い方は、マクロの使い方(2)該当するシートのモジュールにあります。 |
|||
| 4 | オートシェイプを使ってセルに、場所、太さ、線色、線種、を指定した 罫線(実線・点線)を引くには http://cgi.fuji.ne.jp/~fj2094/cgi-bin1/wwwlng.cgi?print+200107/01070161.txt 「罫線の色が黒になってしまいます」 【編集ラウンジ】 |
||
| 選択した範囲のセルに、線の種類、太さ、色、線を引く場所を指定して、
オートシェイプの実線・点線を引くことができます。 マクロの使い方です。 Sub
オートシェイプの色番号確認() このコードの使い方は、マクロの使い方(1)標準モジュールにあります。 |
|||
| 5 | 既存の罫線を、オートシェイプの線に変換するには? http://cgi.fuji.ne.jp/~fj2094/cgi-bin1/wwwlng.cgi?print+200107/01070152.txt 「罫線を図形に変換するには?」 【編集ラウンジ】 |
||
選択範囲内の、既存の罫線(上下左右斜め線)を一括してオートシェイプ(図形)の線に変換します。 Private Type
tLineFormat このコードの使い方は、マクロの使い方(1)標準モジュールにあります。 |
|||
| 6 | 印刷範囲の各ページ最終行に、印刷する時だけ下線を引くには http://cgi.fuji.ne.jp/~fj2094/cgi-bin1/wwwlng.cgi?print+200101/01010071.txt 「罫線を引かずに、最後に線を引く」 【編集ラウンジ】 |
||
| 各ページの行数が決まっている場合のマクロです。 行数がまちまちの場合には、対応していません。 Sub ページ数印刷2() Dim page As Integer, j As Integer, k As Long '最終ページ数取得 page = (ActiveSheet.HPageBreaks.Count + 1) * (ActiveSheet.VPageBreaks.Count + 1) '1ページ目から最終ページまで以下の作業を繰り返す For j = 1 To page k = j * 30 '各ページ30行の場合 'k行目、A列からJ列までに下線を引く With Worksheets("Sheet1").Range(Cells(k, 1), Cells(k, 10)).Borders(xlEdgeBottom) .LineStyle = xlContinuous .Weight = xlThin .ColorIndex = xlAutomatic End With '該当ページだけを印刷 ActiveWindow.SelectedSheets.PrintOut From:=j, To:=j, Copies:=1, Collate:=True 'マクロで引いた罫線を消去 Worksheets("Sheet1").Range(Cells(k, 1), Cells(k, 10)).Borders(xlEdgeBottom).LineStyle = xlNone Next End Sub このコードの使い方は、マクロの使い方(1)標準モジュールにあります。 |
|||
| 7 | 選択範囲に、大きく斜め線(右上がり) http://www.ae.wakwak.com/~efc21/cgi-bin/wwwlng.cgi?print+200308/03080118.txt 「斜め罫線を自動でひきたい」 【VBA編集ラウンジ】 |
||
| オートシェイプの直線でALTキーを推しながら範囲をドラッグ | |||
| 選択した範囲に、右上がりの線を大きくひとつだけ描きます。 Sub 斜め線() Dim hidari As Double, yoko As Double, takasa As Double Dim shita As Double, migi As Double, futosa As Single On Error GoTo TRAP futosa = Val(InputBox("太さを指定してください?", "整数入力", 0.75)) hidari = Selection.Left takasa = Selection.Top shita = takasa + Selection.Height migi = Selection.Left + Selection.Width If Not futosa > 0 Then Exit Sub ActiveSheet.Shapes.AddLine(migi, takasa, hidari, shita).Select '下 With Selection .ShapeRange.Line.Weight = futosa .Placement = xlMoveAndSize End With Exit Sub TRAP: MsgBox "斜線を引くセル範囲を指定してから行ってください" End Sub このコードの使い方は、マクロの使い方(1)標準モジュールにあります。 |
|||
| 選択した範囲に、大きく×になるように、線を描きます Sub 大きく斜め線() Dim hidari As Double, yoko As Double, takasa As Double Dim shita As Double, migi As Double, futosa As Single futosa = Val(InputBox("太さを指定してください?", "整数入力", 0.75)) hidari = Selection.Left takasa = Selection.Top shita = takasa + Selection.Height migi = Selection.Left + Selection.Width If Not futosa > 0 Then Exit Sub ActiveSheet.Shapes.AddLine(migi, takasa, hidari, shita).Select '右上がりの線 With Selection .ShapeRange.Line.Weight = futosa .Placement = xlMoveAndSize End With ActiveSheet.Shapes.AddLine(hidari, takasa, migi, shita).Select '左上がりの線 With Selection .ShapeRange.Line.Weight = futosa .Placement = xlMoveAndSize End With End Sub このコードの使い方は、マクロの使い方(1)標準モジュールにあります。 |
|||
| 8 | 網がけの種類を変更するには http://www.keep-on.com/~excelyou/2000lng4/200007/00070184.txt 「VBAを使って、網掛けされている部分だけを範囲指定するには?」 【VBAラウンジ】 |
||
| シート全体を対象に、既存の網がけを、他の網がけに変更します。 Sub 網掛変更() '変数宣言 Dim nC() As Variant, nR() As Variant Dim T_C As Variant, T_R As Variant, T_Cell As Variant Dim Pa_1 As Integer, Pa_2 As Integer Dim P_S As Variant, c As Long, x As Long Dim Smp As String, tS As String 'エラー処理(実行エラーが発生した場合はラベルErr1:に) On Error GoTo Err1 '変数初期化 P_S = Array(-4126, -4125, -4124, 17, 18, -4128, -4166, -4121, -4162, 9, 10, 11, 12, 13, 14, 15, 16) Smp = "0)75%灰色" & Chr(10) & "1)50%灰色" & Chr(10) & "2)25%灰色" & Chr(10) & _ "3)12.5%灰色" & Chr(10) & "4)6.25%灰色" & Chr(10) & "5)横縞" & Chr(10) & _ "6)縦縞" & Chr(10) & "7)右下がり斜線縞" & Chr(10) & "8)左下がり斜線縞" & Chr(10) & _ "9)左下がり斜線格子" & Chr(10) & "10)極太線左下がり斜線格子" & Chr(10) & _ "11)実線横縞" & Chr(10) & "12)実線縦縞" & Chr(10) & "13)実線右下がり縞" & Chr(10) & _ "14)実線左下がり縞" & Chr(10) & "15)実線横格子" & Chr(10) & "16)実線左下がり格子" Pa_1 = InputBox(prompt:="変更前の網掛けの番号は?" & Chr(10) & _ Smp, Title:="網掛け変更", Default:=0) Pa_2 = InputBox(prompt:="変更後の網掛けの番号は?" & Chr(10) & _ Smp, Title:="網掛け変更", Default:=1) '入力値が異常値の場合処理終了 If Pa_1 < 0 Or Pa_1 > 16 Then Exit Sub If Pa_2 < 0 Or Pa_2 > 16 Then Exit Sub '列探し(列全体でパターンの異なるセルのある列番号を取得) For c = 1 To 256 If TypeName(Columns(c).Interior.Pattern) = "Null" Then x = x + 1 ReDim Preserve nC(1 To x) nC(x) = c End If Next c '列探しで該当列が無い場合は処理終了 If x = 0 Then Exit Sub x = 0 '行探し(行を32行毎に分割してパターンの異なるブロック番号を取得) For c = 1 To 2028 tS = LTrim(Str(1 + (c - 1) * 32)) & ":" & LTrim(Str(c * 32)) If TypeName(Rows(tS).Interior.Pattern) = "Null" Then x = x + 1 ReDim Preserve nR(1 To x) nR(x) = c End If Next c '指定の網掛けを変更 Application.ScreenUpdating = False For Each T_C In nC For Each T_R In nR For Each T_Cell In Range(Cells(1 + (T_R - 1) * 32, T_C), Cells(T_R * 32, T_C)) If T_Cell.Interior.Pattern = P_S(Pa_1) Then T_Cell.Interior.Pattern = P_S(Pa_2) End If Next Next Next Application.ScreenUpdating = True Err1: End Sub このコードの使い方は、マクロの使い方(1)標準モジュールにあります。 |
|||
| 9 | 1行おきに、網がけするには http://cgi.fuji.ne.jp/~fj2094/cgi-bin1/wwwlng.cgi?print+200102/01020167.txt 「見やすい様に網掛けしたい」 【編集ラウンジ】 http://cgi.fuji.ne.jp/~fj2094/cgi-bin1/wwwlng.cgi?print+200103/01030156.txt 「任意のセルに色をつけるには?」 【編集ラウンジ】 |
||
| Sub
網掛け() Dim i As Long, max As Long max = 150 For i = 1 To max 'If i Mod 2 Then '1行目から網掛け If i Mod 2 = 0 Then '2行目から網掛け Range(Cells(i, 1), Cells(i, 12)).Select '12はL列まで With Selection.Interior .ColorIndex = 0 .Pattern = xlGray8 '網掛けの色 End With End If Next End Sub このコードの使い方は、マクロの使い方(1)標準モジュールにあります。 |
|||
| Excel97、Excel2000 共通 1. 網が消したい範囲を選択します。 2. 【書式】-【条件付書式】で【条件1】の【数式が】の欄に =MOD(ROW(),2)=0 を入力します。 3. 次に、【書式】をクリックし、パターンを設定して、OKすると、偶数行に網がけが出来ます。 ※ 気数行に編みがけする場合は、=MOD(ROW(),2)=1 と入力します。 |
|||
| 10 | セルの中央に縦線を引くには | ||
| 線を引くセルを選択してから実行してください。 Sub tatesen_chuuou() Dim yokohaba As Single, tatehaba As Single Dim yoko As Double, takasa As Double Dim shita As Double, migi As Double Dim futosa As Single, chuuou As Double On Error GoTo trap futosa = Val(InputBox("太さを指定してください?", "整数入力", 1)) tatehaba = Selection.Height takasa = ActiveCell.Top shita = takasa + tatehaba yoko = ActiveCell.Left yokohaba = Selection.Width migi = yoko + yokohaba chuuou = (migi - yoko) / 2 + yoko ActiveSheet.Shapes.AddLine(chuuou, takasa, chuuou, shita).Select With Selection .ShapeRange.Line.Weight = futosa .Placement = xlMoveAndSize End With trap: End Sub このコードの使い方は、マクロの使い方(1)標準モジュールにあります。 |
|||
| 11 | セルの中央に横線を引くには http://www.ae.wakwak.com/~efc21/cgi-bin/wwwlng.cgi?print+200103/01030024.txt 「線とセルの位置が合わないんですか………!?」 【VBAラウンジ】 |
||
| 線を引くセルを選択してから実行してください。 Sub yokosen_chuuou() Dim yokohaba As Single, tatehaba As Single Dim yoko As Double, takasa As Double Dim shita As Double, migi As Double Dim futosa As Single, mannaka As Double On Error GoTo trap futosa = Val(InputBox("太さを指定してください?", "整数入力", 1)) tatehaba = Selection.Height takasa = ActiveCell.Top shita = takasa + tatehaba yoko = ActiveCell.Left yokohaba = Selection.Width migi = yoko + yokohaba mannaka = (shita - takasa) / 2 + takasa ActiveSheet.Shapes.AddLine(yoko, mannaka, migi, mannaka).Select With Selection .ShapeRange.Line.Weight = futosa .Placement = xlMoveAndSize End With trap: End Sub このコードの使い方は、マクロの使い方(1)標準モジュールにあります。 |
|||
| 12 | 色の定数 次の定数は、実際の値の代わりにコード内のどの部分でも使うことができます。 |
||
Index |
定数 |
値 | 色 |
1 |
vbBlack | 0x0 | 黒 |
3 |
vbRed | 0xFF | 赤 |
4 |
vbGreen | 0xFF00 | 緑 |
6 |
vbYellow | 0xFFFF | 黄 |
5 |
vbBlue | 0xFF0000 | 青 |
7 |
vbMagenta | 0xFF00FF | マゼンタ |
8 |
vbCyan | 0xFFFF00 | シアン |
2 |
vbWhite | 0xFFFFFF | 白 |
| Sub
test() Cells(1, 1).Interior.ColorIndex = 1 Cells(2, 1).Interior.ColorIndex = 3 Cells(3, 1).Interior.ColorIndex = 4 Cells(4, 1).Interior.ColorIndex = 6 Cells(5, 1).Interior.ColorIndex = 5 Cells(6, 1).Interior.ColorIndex = 7 Cells(7, 1).Interior.ColorIndex = 8 Cells(8, 1).Interior.ColorIndex = 2 Cells(1, 3).Interior.Color = vbBlack Cells(2, 3).Interior.Color = vbRed Cells(3, 3).Interior.Color = vbGreen Cells(4, 3).Interior.Color = vbYellow Cells(5, 3).Interior.Color = vbBlue Cells(6, 3).Interior.Color = vbMagenta Cells(7, 3).Interior.Color = vbCyan Cells(8, 3).Interior.Color = vbWhite End Sub このコードの使い方は、マクロの使い方(1)標準モジュールにあります。 |
|||
| 13 | 選択したセルから、上のセル全部と左のセル全部に色を付け、 行列番号を瞬時に確認したい http://cgi.fuji.ne.jp/~fj2094/cgi-bin5/wwwlng.cgi?print+200103/01030082.txt 「行と列の色を自動で変えるには?」 【その他ラウンジ】 |
||
| 下記の例では、セルに黄色のパターン色をつけています。
すでにパターン色がある場合は復元していませんので注意して下さい。 また、A100 と A101 のセルをメモに使っています。 不都合があればほかのセルに変えて下さい。 Private Sub Worksheet_Activate() Cells(1, 100) = ActiveCell.Row Cells(1, 101) = ActiveCell.Column End Sub Private Sub Worksheet_SelectionChange(ByVal Target As Excel.Range) Dim m As Integer, n As Long, i As Integer, j As Long ' メモを読む n = Target.Row m = Target.Column On Error Resume Next ' 前回の黄色パターン色を消す For i = 1 To Cells(1, 101).Value Cells(Cells(1, 100).Value, i).Interior.ColorIndex = xlNone Next For j = 1 To Cells(1, 100).Value Cells(j, Cells(1, 101).Value).Interior.ColorIndex = xlNone Next '黄色にする For i = 1 To m Cells(n, i).Interior.ColorIndex = 6 Next For j = 1 To n Cells(j, m).Interior.ColorIndex = 6 Next ' メモ書き込み Cells(1, 100).Value = n Cells(1, 101).Value = m On Error GoTo 0 End Sub このコードの使い方は、マクロの使い方(2)該当するシートのモジュールにあります。 |
|||
| 14 | 罫線を引く&罫線の解除 http://www.ae.wakwak.com/~efc21/cgi-bin/wwwlng.cgi?print+200104/01040048.txt 「罫線を引く&罫線の解除」 【VBAラウンジ】 |
||
| 選択範囲内の全てのセルに罫線を引きます Sub 罫線() Selection.Borders.LineStyle = xlContinuous End Sub Sub 罫線解除() Selection.Borders.LineStyle = xlNone End Sub このコードの使い方は、マクロの使い方(1)標準モジュールにあります。 |
|||
| 15 | 罫線の定数 http://cgi.fuji.ne.jp/~fj2094/cgi-bin5/wwwlng.cgi?print+200201/02010111.txt 「”罫線のスタイル”を知りたいのですが」 【その他ラウンジ】 |
||
| 【セルの書式設定】【線のスタイル】では14種類ありますが、 LineStyleプロパティ8種類、Weightプロパティ4種類を組み合わせて設定します。 |
|||
| クリックすると、 ダイアログボックス 全体を表示します
|
xlNone 線無し | xlDashDotDot 二点鎖線 xlMedium 中太線 |
|
| xlContinuous 直線 xlHairline 極細線 |
xlSlantDashDot 斜線 xlMedium 中太線 |
||
| xlDot 点線 xlThin 細線 |
xlDashDot 一点鎖線 xlMedium 中太線 |
||
| xlDashDotDot 二点鎖線 xlThin 細線 |
xlDash 鎖線 xlMedium 中太線 |
||
| xlDashDot 一点鎖線 xlThin 細線 |
xlContinuous 直線 xlMedium 中太線 |
||
| xlDash 鎖線 xlThin 細線 |
xlContinuous 直線 xlThick 太線 |
||
| xlContinuous 直線 xlThin 細線 |
xlDouble 二重線 xlThick 太線 |
||
LineStyle |
xlNone xlContinuous xlDot xlDashDotDot xlDashDot xlDash xlSlantDashDot xlDouble |
線無し 直線 点線 二点鎖線 一点鎖線 鎖線 斜線 二重線 |
|
Weight |
xlHairline xlThin xlMedium xlThick |
極細線 細線 中太線 太線 |
|
Border |
xlBottom xlLeft xlRight xlTop xlDiagonalDown xlDiagonalUp xlInsideHorizontal xlInsideVertical |
セルの下側 〃 左側 〃 右側 〃 上側 斜線(右下がり) 斜線(右上がり) セル範囲の真ん中の水平線 〃 垂直線 |
|
| 16 | 40以下の数値が入っている行全体に色をつけるには? http://cgi.fuji.ne.jp/~fj2094/cgi-bin1/wwwlng.cgi?print+200106/01060094.txt 「40以下の数値が入っている行に色をつけたい」 【編集ラウンジ】 |
||
| 以下のようなシートで、40点以下の点数があればその行全体に色をつけます。 A B C D E 1 生徒名 国語 社会 数学 理科 合計 2 たなか 60 70 95 25 3 ささき 55 60 70 80 4 すずき 30 80 65 90 1. 2行目の行番号をクリックして、行全体を選択します。 |
|||
| Sub
miko_test() Dim LastRow As Long, i As Long, j As Integer LastRow = Cells(Rows.Count, 2).End(xlUp).Row For i = 2 To LastRow For j = 3 To 6 If Cells(i, j) <= 40 Then Rows(i & ":" & i).Interior.ColorIndex = 6 End If Next Next End Sub このコードの使い方は、マクロの使い方(1)標準モジュールにあります。 |
|||
| 17 | 色のインデックス番号が知りたい http://cgi.fuji.ne.jp/~fj2094/cgi-bin1/wwwlng.cgi?print+200207/02070214.txt 「まるすうじ⑳以上を入力するには?」 【編集ラウンジ】 http://cgi.fuji.ne.jp/~fj2094/cgi-bin1/wwwlng.cgi?print+200107/01070099.txt 「罫線の色をかえたい」 【編集ラウンジ】 |
||
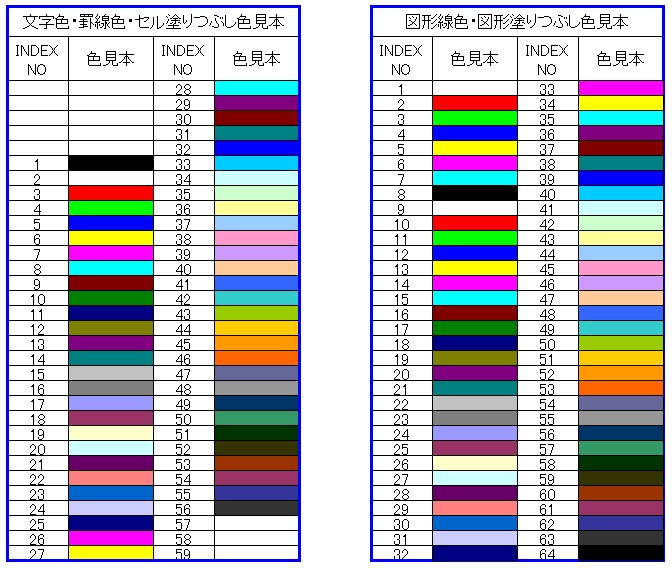 |
|||
| 上の色見本をシートに作成するマクロです。 Sub 色見本() |
|||
| 18 | アクティブセルの行全体を塗りつぶすには? http://www.ae.wakwak.com/cgi-bin/sbox/~efc21/wwwlng.cgi?print+200107/01070244.txt 「入力時に入力してるセルの行が塗り潰し(水色)になる方法は?」 【VBAラウンジ】 |
||
| Excel2002確認済み セルを選択する前に既に塗りつぶしてあった場合、 塗りつぶしを消してしまって復元しませんのでご注意ください。 Private PrevCell As Range Private Sub Worksheet_SelectionChange(ByVal Target As Range) Dim a As Long, b As Long If Not PrevCell Is Nothing Then a = PrevCell.Row Rows(a).Interior.ColorIndex = xlNone End If b = ActiveCell.Row Rows(b).Interior.ColorIndex = 8 Set PrevCell = ActiveCell End Sub このコードの使い方は、マクロの使い方(2)該当するシートのモジュールにあります。 |
|||
| 19 | ひとつのセル内に複数の縦線(桁区切り線)を引くには? |
||
| 選択範囲のセルに、指定の数の区切り線を入れます。 線の間隔は、文字の大きさで変わってきますので、適当に調節してください。 ちなみにデフォルト値は、11ポイント、MS Pゴシック、セルの書式をユーザー定義 0"円" にしています。 Sub miko_test() Dim aa As Double, a(2) As Double, b As Integer, c As Integer, i As Integer, j As Integer b = 5 '区切り線のデフォルト値 a(1) = 12 '一番右端の区切り線間隔の、デフォルト値 a(2) = 5.8 'その他の区切り線間隔の、デフォルト値 b = Application.InputBox(Prompt:="ひとつのセル内に、何本の区切り線を引きますか?", Default:=b, Type:=1) a(1) = Application.InputBox(Prompt:="一番右端の区切り線の間隔は何ポイントにしますか?", Default:=a(1), Type:=1) a(2) = Application.InputBox(Prompt:="その他の区切り線の間隔は何ポイントにしますか?", Default:=a(2), Type:=1) If b = False Or b < 1 Then Exit Sub If a(1) = False Or a(1) < 0 Then Exit Sub If a(2) = False Or a(2) < 0 Then Exit Sub aa = Selection.Left + Selection.Width For i = Selection.Columns(Selection.Columns.Count).Column To Selection.Columns(1).Column Step -1 aa = Cells(, i).Left + Cells(, i).Width - a(1) ActiveSheet.Shapes.AddLine(aa, Selection.Top, aa, Selection.Top + Selection.Height).Select Selection.ShapeRange.Line.DashStyle = msoLineRoundDot '点線丸 For j = 2 To b aa = aa - a(2) ActiveSheet.Shapes.AddLine(aa, Selection.Top, aa, Selection.Top + Selection.Height).Select Selection.ShapeRange.Line.DashStyle = msoLineRoundDot '点線丸 Next Next End Sub 上のコードでデフォルト値を変えてみました。 |
|||
| 20 | 選択範囲の塗りつぶしの色を、一気に他の色に変更するには? http://cgi.fuji.ne.jp/~fj2094/cgi-bin1/wwwlng.cgi?print+200204/02040094.txt 「複数のセルの色をいっぺんに変えるのには?」 【編集ラウンジ】 |
||
| 変更前の色はセルから選択し、変更後の色はダイアログボックスから選択します。 Sub ChColor() Dim ccode As Byte, chcode As Byte, insh As String Dim hani As Range, Accl As Range, rngCell As Range On Error Resume Next insh = ActiveSheet.Name Set hani = Application.InputBox("色を変換する範囲をドラッグしてください", Type:=8) If hani Is Nothing Then MsgBox "キャンセルされました": GoTo ErrStp If hani.Areas.Count > 1 Then MsgBox "複数選択不可です": GoTo ErrStp If hani.Parent.Name <> insh Then MsgBox "シートは変更不可です": GoTo ErrStp Set Accl = Application.InputBox("検索する色のセルをクリックしてください", Type:=8) If Accl Is Nothing Then MsgBox "キャンセルされました": GoTo ErrStp If Accl.Count <> 1 Then MsgBox "複数選択不可です": GoTo ErrStp If Accl.Parent.Name <> insh Then MsgBox "シートは変更不可です": GoTo ErrStp On Error GoTo 0 ccode = Accl.Interior.ColorIndex Accl.Activate MsgBox "次のダイアログでは変更後の新しい色を選択してください" Application.Dialogs(xlDialogPatterns).Show chcode = Accl.Interior.ColorIndex For Each rngCell In hani If rngCell.Interior.ColorIndex = ccode Then rngCell.Interior.ColorIndex = chcode Next ErrStp: Set Accl = Nothing Set hani = Nothing End Sub |
|||
